


Artificial stone installation in Madrid
How to install your Kopiedra stone step by step
Practical guide for perfect placement of our models
Step-by-step guide for a perfect installation
MODELS: Patones, Langa, Burgos Panel, Bilbao, Lugo, Berlin, Amazona, Galicia, Zamora, Boston
These are models that are placed "running" maintaining the horizontality of the panels, breaking the vertical lines.
Its ease of installation and speed allow for the execution of large-scale projects without interfering with other phases:
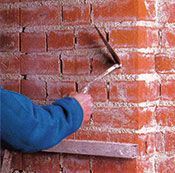
- Clean the surface where the substrate will be placed; for preparation of the substrate, refer to the dedicated section. (Photo 1)
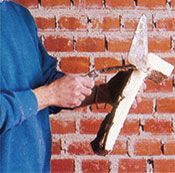
- Sharpen the parts from the manufacturing waste (photo 2)
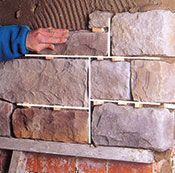
- Mark levels on the wall every 30/40 cm to ensure horizontality during installation
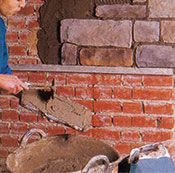
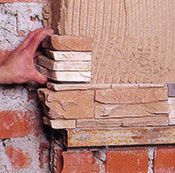
- Begin placement with the corners, from the bottom upwards, alternating the short side with the long side (photo 6)
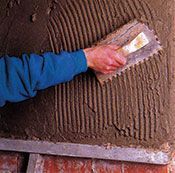
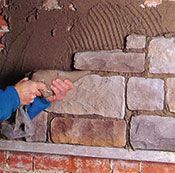
- Spread the adhesive cement with a trowel or spatula on the wall over a surface that allows placement within the working time of the adhesive cement (30min) (photo 3)
- Apply another layer of tile adhesive to the entire surface of the back of the piece (double bonding). (photo 4)
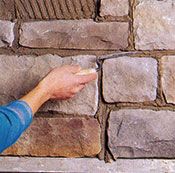
- Apply the piece to the wall, exerting adequate pressure and using small circular movements to avoid the formation of dangerous gaps between the stone and the wall. (photo 5)
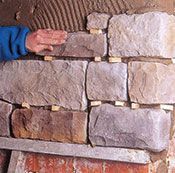
- Check periodically that the placed material is covered with adhesive cement on its entire back.
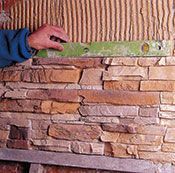
- Taking leveling steps every two or three rows to check their horizontality, and stepping back from the wall, also helps to understand the correct execution of the wall. (photo 8)
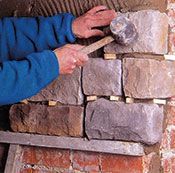
- If necessary, cut the pieces with an angle grinder with a diamond blade.
MODELS: Rome, Torla, Tivoli, Burgos, Logroño, Vienna, Zurich, Bern.
These models can be installed with or without joints; care must be taken to avoid breaking horizontal and vertical lines. They allow for different mortar finishes: deep joint, full joint, etc., and they lend a realistic look to the wall without architectural compromises.
- Open more boxes of the material and position the pieces on the floor so that the different dimensions can be seen correctly, in order to simulate the result on the wall.
- Clean the surface where the substrate will be placed (for substrate preparation, refer to the dedicated section). (photo 1)
- Begin installation with the corners, from the bottom upwards, alternating the short side with the long side. (photo 7)
- Spread the adhesive cement with a trowel or spatula on the wall over a surface that allows placement within the opening time of the adhesive cement (30min) (photo 3)
- Apply another layer of tile adhesive to the entire surface of the back of the piece (double bonding). (photo 4)
- Apply the piece to the wall, using appropriate pressure and small circular movements to avoid creating dangerous gaps between the stone and the wall. (photo 5)
- Check periodically that the placed material is uniformly covered with adhesive cement on its entire back.
- MAINTAIN cement adhesive thicknesses of less than 1cm.
- Maintain a certain linearity in the placement. (photo 9)
- If necessary, cut the pieces with an angle grinder using a diamond blade, or simply by tapping them with a trowel from behind the piece near the cut. The cut will be irregular and will give the wall a more realistic effect. The pieces can be shaped with nippers.
- Pieces that are broken or split due to transport can be reused as if they were cut pieces.
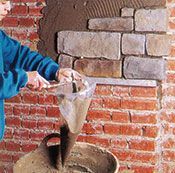
- We prepare the mortar Kopiedra
well-mixed cement. - Cut the piping bag to the size of the joint.
- Fill the piping bag and check that it comes out well with consistency (photo 10)
- Fill the joint, making sure to cover the gaps between stones and the cuts in the pieces according to the desired effect. (photo 11)
- Wait 30 to 40 minutes and then use a wound sealant or a small wooden stick to refine the wound according to the desired effect. (photo12)
- Gently clean away dust and debris from the finished job with a soft brush.
MODELS: CREATE Kopiedra
These are mixed models in each box and are ready for placement; we advise selecting the pieces from two or more boxes at a time.
Arrange the materials on the floor in a composition similar to the one you will place on the wall. Having the pieces on the floor, outside of their boxes, helps to better understand their shapes and colors.
It is necessary to mix the pieces, taking care of the placement of the colors and dimensions; light tones next to dark ones, large pieces next to small ones. The correct weighting of these aspects, along with the cleanliness of the placement, will give a uniform appearance to the wall.
The procedure is then followed as for models with joints from point 2.
MODELS: Louisiana, Toledo, Voltoya
The bricklaying process follows exactly the same steps as for models with mortar joints. It is necessary to mark the wall with levels every meter and frequently check the horizontality of the facade, because due to its straight and regular profile, any unevenness in the installation will be magnified when viewed from a distance.